Sunday, December 22, 2013

Project Sunday: Nightstand Makeover

Hello, lovelies!

So much has happened since the last post (I know it's been forever...sorry!), and on another day I'll write about the whirlwind that has blown through our lives since November 10th. There's been so much joy and sadness in these past weeks, and I need to collect my thoughts before I can write about all of it. In the meantime, I have a backlog of things to blog about, and I'd like to introduce a new schedule so there's a project and a recipe every week. There will be lots of great additions to CC in its second year.


Past Project Sundays: lamp revamp, desk makeover, braided hairstyles, button earrings

I love free stuff, and useful stuff. The only thing better than free stuff is inexpensive stuff. I'm very happy that I only spent $16 to makeover two nightstands, which we needed in our bedroom to house a random collection of books, paperwork, jewelry, etc. I wasn't willing, however, to spend a small fortune to get them.

The stars seemed to align after I cleaned out my childhood bedroom and rediscovered these two white nightstands. They're not glamorous, but they're durable and I won't be heartbroken if we have to sell them or leave them behind the next time we move. As you can see, my 13-year-old self started a beautification process, but I never finished it.


Check out that stellar palm tree. Skills, my friends, skills.


A second big break came in this project after I visited a friend who had somewhat recently painted a vintage dresser olive green and had leftover paint to spare. SCORE!

It took some brainstorming before I knew what else I wanted to do with the nightstands. I felt a military-ish vibe and knew that I could achieve that look with brass nailhead trim. With a coupon at Joann's, I spent $16 on the trim, and used all of it on the nightstands. Here's what I purchased:


 I couldn't take photos of the process because I was working in the basement. There was no way I was going to sand and paint outside in New York State November temperatures. No thank you. I'll stay in the concrete, dark basement.

I sanded the nightstands, wiped them down with a damp towel, then painted two coats of olive green paint. I let them cure overnight before nailing on the trim. 


Before and After:
Hurray for crooked pictures! This is what happens when you try to take photos in a small room.

To make our bedroom a bit more festive, I dug out the red down comforter. Here's what the stands look like in our room.


We clearly need some artwork in there.... Maybe that will be a future project! Any suggestions? Usually we have a gray comforter on the bed, so I think a bright piece above the bed would look interesting.


 Here's a very bright photo of my stand:


And Mr. J's rather naked stand:


Neither of the lamps are very exciting, as they were both gifted to us, and the blue mosaic candle holders are from Pier One.

How is your Project Sunday?

Much love,
Danni

This project was linked to:
Frugal By Choice, Cheap By Necessity
C.R.A.F.T.
This Gal Cooks
Skip to My Lou

ONE YEAR AGO: Easy Christmas Fudge


Sunday, November 10, 2013

Project Sunday: Button Earrings


Hello, lovelies! Happy Project Sunday!

Past Sunday Projects: lamp revamp, desk makeover, braided hairstyles

I'm not sure exactly how it happened, but somehow I became my family's "button lady." I never had any intention to collect buttons, nor any inclination for that matter. My mother had a basket of buttons that perpetually remained in a closet somewhere; I have no memories of her actually using said buttons, though she did sew curtains every few years for the house. The first time I myself used buttons was four years ago to decorate scrapbook pages. Until this year, I never thought of buttons as remotely interesting.

Over the summer, however, my grandfather handed me a small cardboard box and told me to take a look inside. If my Papa tells me to investigate something, it almost always involves chocolate or history. In this case, it was history. The box was filled with buttons. Some were loose, some matched, some were still attached to the paper they were sold on, and others were in tiny envelopes. There was one envelope mailed from a New York City button company to my great-grandmother Doris in the 1950s.

For the first time, I felt a nostalgic wonder as I handled buttons. Each button was collected by my great-grandmother and a few other relatives. It was strange and wonderful to hold the same buttons that Doris had held, particularly because I was not close to her while she was alive. She was ill for most of my childhood and then moved out of state to a full-time care institution before she died. By contrast, I was very close to my grandmother's mother, Geraldine, or Bam as all her great-grandchildren called her. I visited Bam almost every week for 13 years. Bam and I shared inside jokes, lots of stories, and many memories. It's easy to recall her face and her voice because we had so much together. It was very powerful to have a piece of my other great-grandmother, too.
Since I received this box, I've received a tin of other buttons found in the church I spent so much time in as a child. Apparently, the older ladies in the congregation thought of me when they found them. How sweet is that?! I have yet to clean and sift through the new buttons, but I will. I quite enjoy being the button lady now, especially because it means I can use them to create pretty things, like earrings!

Here's a close up of some of the buttons from my great-grandmother and other family members:


Aren't they gorgeous? I'm saving some of them for when I finally start sewing clothing, but I wanted to use some of them immediately. I made 11 pairs of earrings in 15 minutes for less than $1, and I'll show you how you can make your very own button earrings in just minutes.

3 steps: Clean. Glue. Wear.

You need to prep your buttons first! Wash them gently. I put baking soda, hydrogen peroxide, and water in a small bowl and soaked the buttons for a few seconds. Then, I used a cotton bud to wipe off any leftover residue, and dried them with a cotton towel. I used a pair of pliers to remove hooks from the back of the buttons to make a smooth area for gluing.

You need flat pad earring posts with butterfly clutches, like these. I purchased two different sizes at Joann's.
The 48-pack of surgical steel posts and 2 10-packs of gold posts cost less than $3 total (sale & coupon).


 Attach the posts to the buttons using a strong glue, like E-6000. I used a cotton bud to apply the glue.


 Let the glue dry for at least 30 minutes before use. Clean the posts with rubbing alcohol to disinfect before wearing your new, vintage earrings!


 Here are some pics of the other earrings I made.


And here's what my new earrings look like on! I love that they're big and loud and 80s.


I want to see your button earrings. Show them off!

Much love,
Danni


Linked to parties here:
Nifty Thrifty Things
Flamingo Toes
Sew Many Ways
The Girl Creative

ONE YEAR AGO: Vanilla Bean Cheesecake

Thursday, November 7, 2013

How to bake pumpkin guts! Sexy Vegetarian Thursday.


Hello, lovelies!

Decorating for fall and celebrating Halloween may have left you with some smaller pumpkins around the house. You can quickly turn those fellows into delicious roasted seeds to snack on and yummy puree to use for baking. Imagine how delightful your holiday pumpkin pie will be when made with homemade puree!

For a flavorful puree, you'll want to use pie sized pumpkins. I used two small pumkins to make just over 3 cups of puree.

Carve a small circle around the stem and remove it. Cut the pumpkin in half, remove pulp and seeds (set seeds aside!), and slice pumpkin into roughly equal wedges.


Place pumpkin wedges on an ungreased baking sheet. You do not need to put anything on the pumpkin; this way, you will get the purest pumpkin puree possible (yay alliteration!).  Bake in 350 degree oven for 45 minutes until tender.


Remove the skin from the wedges.


 Cut pumpkin into smaller chunks and place in blender or food processor. You may need to add some water as you blend to smooth out the puree. I needed almost 1/4 cup of water. Add 1 tablespoon of water at a time.


 Blend and scrape down the sides until you have lovely, smooth puree.


 You can use the puree right away or freeze it for later use. I found it was easiest to turn down the sides of a freezer bag and sit it upright to scoop the puree into it. I filled 2 quart size bags.


 Carefully lay the bags flat and press out the air before sealing. Now they're nice and flat so you can stack them in your freezer! I labeled how much was in each bag and when the puree was made.


Don't waste those seeds! It's so easy to roast them for a healthy, fall snack.

Rinse the seeds well after removing most of the pulp.


 Let seeds dry overnight on a baking sheet.


 Drizzle with olive oil, salt, and pepper; mix seeds to distribute.


 Bake for an hour in a 250 degree oven.


Enjoy! Store in an airtight container.

Have fun baking your pumpkin guts, and enjoy the delicious smell of autumn that will fill your house.


Much love,

Friday, November 1, 2013

Ten Fall Favorites!


Hello, lovelies!

It's officially fall, my favorite time of year! What's not to love? Crisper weather, beautiful leaves, pumpkin and apple flavored everything, and I can finally wear layers!

Mr. J and I kicked off fall right by picking 14 pounds of local apples and visiting nearby-ish farms. I get so excited about things I get to eat, like the apples, cheese curds, and donuts I noshed on that day. It's probably a crime how amped I get about apple cider donuts.
I thought it'd be fun to share with you some things I am in love with so far this fall, and you can share with me what's tickling your fancy during these cooler days. As I always tell the teens I teach, "Sharing is caring, unless it's a STD." It's a pretty sweet catch phrase. Spread it around. The saying, not an STD. 

Anyway...Let's get festive!
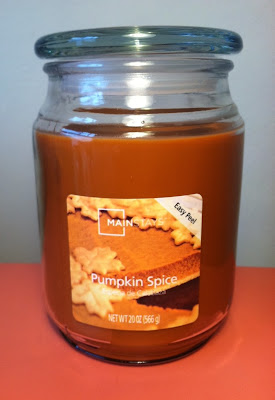
1. Mainstays Pumpkin Spice candle
Walmart, $5
This is one of the best pumpkin scented candles I've ever encountered. The scent permeates our entire apartment, and the wick burns evenly and slowly. When these babies went on sale in September, I bought two. I already wish I bought more because I already burned through one!


2. Wegmans Pumpkin Pie Coffee
Wegmans, $6.99

This is my favorite pumpkin coffee. I think Dunkins Donuts' flavor is horrid and overpowering. Wegmans' is flavorful without being too much. I've had it every day for the last month. So yummy!

3. local apple cider
&
4. fall scarf from Target
 Yes, this photo happened. I should know by now that it's impossible to take a selfie that doesn't look completely stupid. So, there it is, in all its awkward glory. Anyhow, the points of this ridiculous pic are: (a) I love apple cider, probably on an unhealthy level, and (b) look at my cute scarf! It was a Target snag 2 years ago. It has perfect fall colors and mixed floral prints, and is lightweight so it's easy to wear when the weather is still warm.

5. Lower East Side Chelsea Flat
 Payless ShoeSource, $19.99

 (source)
I love these flats. They're super comfortable, a great faux-leather color, and affordable. You can count on Payless to have a BOGO sale, too, which is exactly how I scored these for just $10.

6. Graphic Crew Neck Sweater
Old Navy, $29.00
(source)
I love how preppy and happy this sweater is! The elbow patches really set it aside from your average striped shirt. It's also really comfy and warm, perfect for a fall day!

7. Heart Wrap & Nautical Charm Bracelets
 Alex & Ani, $48, $28

(source)

(source)

Admittedly, these were an indulgence. My mom insisted I buy myself something nice for my birthday and my best friend suggested Alex & Ani. They have really beautiful jewelry, and I love the vintage finish of these two pieces. I've worn them everyday for over a month.

8. Nail Polish
Pixel Don't Leaf It Behind: Wegmans, $1.99
Ulta Candy Coated: Ulta, $2 on sale
OPI You Don't Know Jacques: Ulta, $9
It was hard to capture a picture that does justice for these colors. I was on the hunt for a matte hunter green, a shimmery bronze, and a matte gray/taupe. I found all three in the same day! You Don't Know Jacques is the only OPI nail polish I own because, seriously, who wants to pay more the $5 for a bottle? I've been alternating between these three colors since the day fate brought them into my life :)

 9. Milani Baked Blush in Luminoso
Walgreens, $7.99

 (source)
Luminoso is a very popular color in this line of baked blushes because it is very similar to a NARS blush that's over 3 times more costly. A little bit of this peach-gold shade goes a long way, so I thought it was a worthwhile investment. I feel like I'm glowing whenever I wear this.

10. Punctuate weekly planner in purple paisley
Barnes & Noble, journal
Making lists and filling out calendars are tasks I adore; they're so therapeutic! This planner and I are a match made in heaven. The cover's paisley print has great colors and stitching details, and I like the flexible texture of it. It also filled my requirement of a large, clean layout of the month so I can easily plan weeks ahead. The nerd in me is very happy.

What are you loving this fall?

Much love,
Danni