Monday, December 31, 2012

homemade gifts part 2 and my injured Leo

Yesterday and this morning, I've had so much fun with my new kitchen gadgets and spending quality time with Mr. J that I should have known the other shoe was going to drop. When I finally got around to clearing the over 12" of snow off my car, I found two holes in my back windshield and lots of glass and some snow in my back seat. Lovely, right? Happy friggen New Year. Mr. J tried to help me figure out what damaged the shield, but we didn't find any rocks, etc. in the car. Our best guess is that the person who plowed our driveway in our absence may have kicked up some ice. This is what the holes looked like at first:


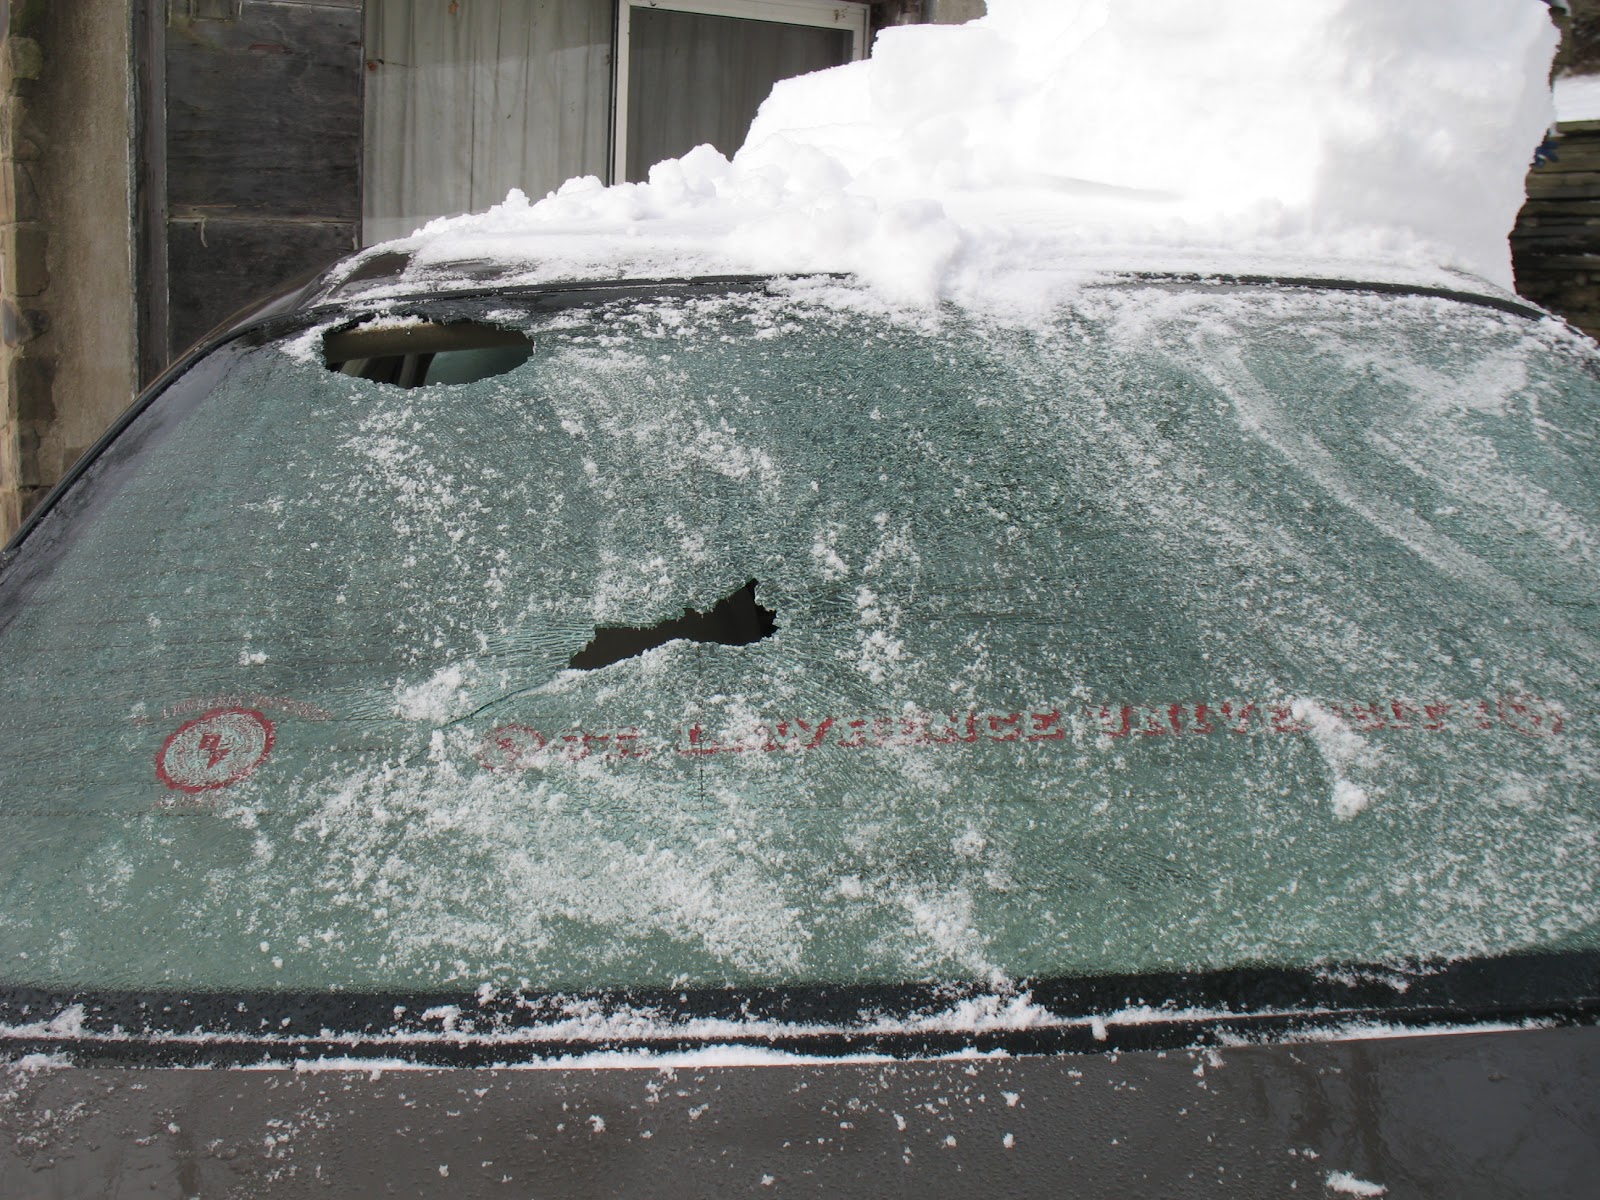
Then, it just kept getting better. The area between the two holes caved in, too.


After I had spent 20 minutes picking up tiny shards of glass, more glass replaced it.


That's when I gave up. Thankfully, the insurance agent called me back and we arranged a time for a mobile service provider to come to the house and replace the glass on Friday. So, I am vehicleless until then. I am very thankful for my grandmother, who walked me through what to do, and Mr. J, who was cool as a cucumber and willing to drive me to work and back until poor Leopold is fixed.

To make myself feel better, and hopefully to give you all some ideas, here is the second set of homemade gifts I create this year for Christmas. The first set is here.

Knitted Scarf

Over the summer, I was in a store with my youngest cousin. She is a very stylish, opinionated, cheeky 11-year-old-going-on-25. She's been taller than me for years and she's given me fashion advice on more than one occasion. Sometimes it's easy to forget her real age! I love this girl to pieces, and I knew I wanted to make her something special for Christmas. However, inspiration hadn't struck just yet. That is, not until she and I were wandering around this store and I dragged her into a yarn aisle. She rolled her eyes and humored me for a few minutes until she spotted a pink, blue, and purple yarn ball that made her eyes light up. I took note, asked a few questions, and not-so-stealthily put the yarn in my basket. I spend months knitting her a long scarf of medium width ( I am not that slow of a knitter; I just set it down after a couple weeks and later picked it back up). I am definitely not a knitting expert, but I can count stitches, knit in a straight line, and keep a consistent tension. There were 17 stitches and it ended up being over 3 feet long.


Felt Heart Gloves

To go with her new scarf, I customized a set of blue gloves for my cousin. I had the new gloves on hand (ha) already, as well pre-cut felt hearts in a variety of colors. I used my trusty Heat N Bond to iron small pink hearts onto larger white ones, then the white hearts to the gloves. It took a grand total of five minutes! I placed a piece of cardboard inside the glove to prevent the glove from fusing to itself.


Framed Initial Sign

My best friend has a beautiful baby girl named Bianca who I ADORE. I wanted to make Bia something cute to decorate her room. This was very easy to make and fun to design. The first thing I did was to use Word to find a font I liked. Then, I test printed the B onto white paper. When I get the letter positioned properly, I cut a pretty piece of scrapbooking paper to fit the frame and printed the B onto it.

Once the ink dried, I used hot glue to attach coordinating buttons over the letter.


At first, I wasn't so sure I liked that some of the ink was visible, but when I came back to the frame a week later, I liked the effect.


Enjoy! xo

Sunday, December 30, 2012

Returning from my break with homemade gifts part 1

I know, I know: it's been a while. As much as I missed blogging about my craft and cooking adventures, I cannot deny that taking a week-long break was absolutely lovely. Mr. J and I spent the last week traveling miles around the state to see our families for Christmas. We had to battle through two snowstorms to do so, but it was worth it! Not only did we spend lots of quality time with our loved ones, but we also made out like bandits during our THREE Christmases (one with his parents, one with my sister and father, and one with my mother's family) in two days. Between the two of us, Mr. J and I scored some great kitchenware, including a cast iron dutch oven, two cookbooks, an immersion blender, a Ninja blender and food processor, and a sushi making kit. Needless to say, we spent the majority of this afternoon playing with our new cooking toys! 

Of course, before we could have any fun, we had to deal with the more than 12" of snow waiting for us. When we pulled into the driveway, we found my car, Leopold, like this:

This makes my car look huge and me even shorter than usual.


And here's the walkway we had to shovel from the stone steps to the door just so we could get in the house:


Thanks, Mimi, for those amazing North face winter boots! I definitely needed them to trudge through this mess :)

After lots of shoveling, heating the house back to a temperature that supports life, and grocery shopping in a psychotically busy Wegmans, we had time to make almond butter and California rolls. Tutorials on those to come!

Now that it is FINALLY past Christmas, I can share with all of you the gifts I made for some family and friends.

Warning: the following is essentially a giant THANK YOU and shout out to an awesome lady, Sarah, over at Frugal by Choice, Cheap by Necessity. From her blog (which is chock full of DIY recipes and projects), I got the idea to make homemade vanilla extract and heating pads.

Making the extract is very simple. Vanilla beans + bourbon + four months in a cupboard = magic! Our price breakdown matched Sarah's exactly because I used everything she did. It cost less than $2 each to make these customized bottles of extract! Using this formula, I have plans to make all kinds of extract right in my own pantry!

  
Call us cornballs, but Mr. J and I had a great time designing and printing our own labels! These little babies garnered some serious praise. The best part about this project is that it require minimal effort for a great outcome. The only drawback is that you need to be on your game to have the extract, bottles, and labels prepared prior to the day you need them.


Sarah also did a great post on DIY rice heating pads. If you have fabric, rice, and a sewing machine, you can do this project! I already had a lot of funky fabric squares on hand, so nearly 10 pounds of cheap white rice later, I had 9 sizeable heating pads to give away! (Actually, I made a tenth one, but it was my first attempt and I decided to hide its ugliness by keeping it for myself, haha.) Once I figured out how to sew the top hem shut without spilling rice everywhere, this process was really enjoyable. I cranked the cheesy holiday tunes and churned these puppies out in one weekend. Here are the beauties!


This was one of my favorites. My best friend has a gorgeous baby girl for whom I made a lot of dinosaur-themed items earlier this year. I ended up with a ton of dino fabric in my possession, and I knew my friend would enjoy a heating pad crawling with prehistoric critters! Isn't it darling?
 
  
I thought this was one of the prettiest ones:


I will share more homemade gifts throughout the week, followed by all of the awesome stuff I'm whipping up courtesy of my own Christmas gifts!

I hope you all had a lovely holiday season! What were some of your favorite gifts that you gave? What about the ones you received?

Monday, December 24, 2012

Merry Christmas Eve! Some holiday ruminations and a spice mix.

Merry Christmas Eve, everyone! I hope those of you who celebrate Christmas are enjoying an anticipation-filled day and you're continuing family traditions with your loved ones. To those of you who celebrate a different winter holiday, I hope you're having a joyous day, too, by playing in the snow or watching a fun movie snuggled up together.

Mr. J said to me an hour ago, "It doesn't really feel like Christmas Eve." I wondered why that is. After all, we are sitting together on the couch, which is literally 2 feet away from the Christmas tree and a pile of brightly wrapped gifts, and later today we are going to Mr. J's parent's church for the Christmas service. Not to mention we got 5 additional inches of snow yesterday! Oh, and, before we left our home on Saturday, we made sure to donate clothes and gifts to a local domestic violence shelter for the women and children there. And, I spent the last 5 weeks crafting handmade presents for our family and friends.

Why, then, doesn't it "feel" like Christmas? Is it because we aren't children or frazzled college kids anymore for whom Christmas is the highlight of the year? Have we already been robbed of Christmas joy by the daily grind of work (or grad school in Mr. J's case)? Are we just too tired? The more I pondered this, the more I began to think about where we are in our life journey.

We're at an age when lots of our friends are getting married and having kids, and Christmas has taken on a new meaning as they witness the holiday through their children or spouses' eyes. This is not to say that Mr. J and I are not having fun this season--in fact, this has been the most relaxing two days I've had since August when we took a mini vacation to the lake! We've been watching holiday movies and reading (and I am really looking forward to sharing what we made with everyone). Plus, I haven't had to cook at all! (Although I'm sure I will get the cooking itch soon and barge my way into Mr's J's mama's kitchen.)

So we're not lacking the Christmas spirit and we love being with our families this week. It seems to me that the only reason left is that time moves so quickly. I can't believe it's already December 24th. I've almost been at my current job for a year already and Mr. J is five months away from getting his Masters degree. I feel like we JUST graduated from college, but that was almost two years ago. I remember my grandmother telling me the day before I left for campus, "Enjoy your college years, honey, because, before you know it, your own kids will be going to school."

At the time, I nodded respectfully and smiled, unable to actually imagine my college graduation or moving in with Mr. J in a new city after that, or having a real job in the adult world. But all of those events happened so fast! My conclusion is that it doesn't feel like Christmas because it came upon us SO QUICKLY! We've been so focused on getting through a work or school day that those very days have flown by. Maybe our Christmas lesson this year is to slow down and savor those everyday moments together. Maybe this should be one of our Christmas traditions.

Are you planning on making pumpkin pie tonight in preparation for Christmas dinner? Try this out!

DIY Pumpkin Pie Spice

2 tbsp. ground cinnamon
1 tbsp. ground ginger
1½ tsp. ground allspice
1½ tsp. ground cloves
¾ tsp. ground nutmeg


Sunday, December 23, 2012

easy Christmas fudge and a Christmas traveling horror story

Please allow me to begin this post by quoting a song from a beloved, family favorite, holiday movie:

"It's that time, Christmas time is here
Everybody knows there's not a better time of year
Hear that sleigh, Santa's on his way
Hip, Hip, Hooray, for Christmas Vacation!"

Yeah, that's right, I love National Lampoon's Christmas Vacation. It doesn't really feel like Christmas until I've commiserated with the Griswolds and reminded myself that if they can make it through their psycho holiday and still enjoy parts of it, then I can handle mine, too. I needed such a reminder after our traveling day from hell.

Yesterday, Mr. J and I commenced our annual holiday celebration plan: we spend four nights each with his parents and with my grandparents. The first leg of the journey required a 2.5 hour drive to his parents' home, which is usually not a problem (I always look forward to driving by a small farm near his parents and mooing at the cows. Yes. I am still five years old.) As excited as we were to start our Christmas vacation, we were a little sad to say goodbye to our dear Christmas tree. We couldn't resist taking pictures of the presents under the boughs.


 Despite our preparations to leave on Friday night, we delayed the trip until the following morning to avoid a snowstorm. No problem, we thought. Ha! Little did we know what was coming our way. We awoke with excitement because there was SNOW where there hadn't been all of last winter or so far this year. We mistook it as a good sign. 

We packed up the truck and left promptly at 10am to use a free coffee coupon and pick up a last minute item. We started traveling to Mr. J's parents at 10:45am. This fact will be important soon, I promise. We hit the highway only to discover high winds and snowy slush on the road. Traffic slowed, rightfully, to travel safely. However, not everyone slowed down: they were plenty of jerks who continued at high speeds through the slush. We started passing accidents, lots of them. Cars were in the ditch, on the side of the road, and eventually IN THE MIDDLE OF THE ROAD. Ya heard. One car was sitting in the middle of the highway facing the wrong way with its separated bumper nearby. This is when we really started to worry. The wind blew harder and more snow fell. We had to slow down to 5mph, and it stayed that way for about an hour.

Before I stress myself into a tizzy by reliving the entire experience, let me say that yet another accident ahead left us and the drivers behind us STATIONARY on a highway for almost half an hour. What should have been a 2.5 hour drive turned into an almost 5 hours charade. We finally made it to our destination and proceeded to watch 3 movies and eat pizza for the rest of the night.

On a happier note, here's my favorite fudge recipe from my grandmother that I added a little something to.

Easy Christmas Fudge

I call this Christmas fudge because it's so simple to make and so easy to eat that I only make it during the holiday season!

Before you get started, line a 9x9 pan with aluminum foil, then grease the bottom and sides with either a little cooking spray or Crisco, like so:


Fill a pot with a couple inches of water and heat it until it simmers. Maintain this temperature. Sit a glass bowl atop the pot, but be sure the bottom of the bowl DOES NOT touch the simmering water.  Pour 3 cups of semi-sweet chocolate chips and one 14 oz. of sweetened condensed milk into the bowl. Stir occasionally until completely melted.


 Add 2 Tbs. of marshmallow fluff (try homemade) and stir thoroughly.


Sorry, I'm not sure why the following pic is lopsided... Turn off the heat. Carefully pull out the bowl and place in onto a kitchen towel. Stir in 1 tsp. of vanilla extract.


 Pour the fudge batter into the prepared pan.


Be sure it's spread evenly! Refrigerate for at least two hours.


Once the fudge is set up, lift the foil out of the pan. Turn it over onto a cutting board and peel off the foil. Now you can cut the large brick into bite sized pieces!


Enjoy! xo

Friday, December 21, 2012

Pintastic Recipes!

I've been waiting to write this post for a few weeks now. In the last month, I've tested out a few recipes that I pinned (yes, I'm a total Pinterest junkie). The time has come to share the results of three Pintests!

 Homemade Marshmallow Fluff

As part of my mission to make more food staples myself instead of opting for store brands, I found this amazing recipe from Cinnamon Spice & Everything Nice for homemade fluff. I have never liked store brand Fluff, but Mr. J is currently obsessed with it. After reading the store container's ingredient list and seeing dried egg white and vanillin (what the hell is that?), I knew I had to try what Reeni calls "the food of angels."

I made sure to read the instructions multiple times before attempting it because the recipe calls for the use of a candy thermometer while cooking sugar, corn syrup, and water for several minutes, which I've never done before. However, it was far less scary than I anticipated, and it took about 20 minutes total. Score!


 What came out of my mixer was the softest, lightest, closest-to-a-cloud-in-my-mouth concoction I could have imagined. It was so dreamily tasty. Mr. J said hands down, this fluff is worlds better than the store bought crap. Bonus: it is way less sticky AND easier to spread on bread!


The only minor downside was the clean up time. I needed to soak everything in hot water to dissolve the hardened sugar before I could even scrub.

Would I make this again? HELLS YES. Probably every week until Mr. J kicks his fluff addiction.


S.O.S. (Soup or Sauce) Mix

I hate having to use condensed cream of whatever soup, but a lot of quick and easy recipes call for it. I wondered for a long time what could substitute for said soup-in-a-can. I wondered, that is, until I found this over at One Good Thing by Jillee: SOS Mix.

Essentially, it's a dry mix that, when combined with water, become a thick, creamy, soup base. The best part: the ingredients are real things that exist in your very own cupboard!


I made a half batch which is equivalent to over 4 cans of soup. Using the SOS mix and fresh mushrooms instead of condensed cream of mushroom soup pumped up my weeknight stroganoff with flavor and a great texture.


The downside: if you don't have these ingredients on hand to start with, you will have to make a bit of an investment. However, all of the bits and pieces are useable in TONS of other recipes, and they will be available to make your SOS mix time and time again.

Would I make this again? ABSOLUTELY.

Pumpkin Panna Cotta

In search of a festive, easy dessert with lots of fall/winter flavors, I combed through Pastry Affair's archives because I drool over everything that girl makes. I found this recipe for pumpkin panna cotta. It seemed to have it all: easy and quick assembly, yummy flavors, and spot on presentation. The stars seemed to align when I spotted a $5 set of 4 eco-friendly ramekins at Home Goods. I knew I had to try this out.


You really have to like pumpkin to enjoy this dessert. Luckily, I do! I thought it had perfect fall flavors, especially with freshly whipped cream and cinnamon on top. It's not too rich, but it is filling and sweet enough to satisfy a late-night sugar craving.


Mr. J, however, does not like pumpkin, so it was a fail in his book. He took one bite and politely refused to eat anymore (what a gent!). The panna cotta also has the texture of pumpkin pie filling, which is a turn off for some. If I had to do this project over, I would make half a batch. The recipe filled 4 ramekins, which is basically 8 desserts that I have to eat on my own. It's a whole lotta pumpkin in a week that doesn't include Halloween.

Would I make it again? Yes, but only for a bigger crowd or in a smaller portion.

I hope this was helpful. Let me know if you try any of these recipes!

Enjoy xo

Thursday, December 20, 2012

Creamy tomato feta penne: sexy vegetarian Thursday!

Friends, what do you think is the best thing about Thursday?

I have two favorite things. Firstly, it's almost Friday. And thank the powers that be for that, especially after this week. I don't know if it's the proximity to the holidays or the colder weather, but at work I've found myself quoting Nathan Lane's character in The Producers every few hours:

"They come here. They ALL come here. How do they find me?!"

That really about sums up the week.

I cannot wait until this weekend to go far, far away from my job.

Secondly, it's sexy vegetarian Thursday!

UPDATE: I have to make this fast because my amazing Mr. J just put on The Nightmare Before Christmas. I am literally squealing with excitement! Give this easy pasta recipe a try, m'kay?


Creamy Tomato Feta Penne

Boil 1 pound of penne (we prefer organic whole wheat).

Once you've strained it, make the following sauce in the same pot. Hurray for only dirtying one dish!

3/4 jar of your favorite marinara sauce
1/4 cup of heavy cup (add until it creates a beautiful deep orange color)
splash of lemon juice
1/4 cup grated Parmesan cheese
at least 2 oz. of crumbled feta cheese
two handfuls of cherry tomatoes, quartered
salt and pepper to taste (you won't need much!)

Once the sauce begins to steam, not boil, replace the pasta into the pot. Stir well and serve!

Enjoy xo

Comment below about your favorite thing about Thursday!

Monday, December 17, 2012

Shrek's got nothin' on these layers: layered taco dip

I can't believe I wrote that title. The English major within me is crying in shame. The five year old inside of me, however, is laughing gleefully. And drawing on the walls with crayon. And watching Shrek and quoting every line before a character says it. Is my love for Shrek obvious yet?

Anywho, this is a party chip dip Mr. J and I have made a few times (it's a Mama J classic) and it brings down the house WITHOUT FAIL. This past weekend, we whipped this up for a holiday get together and everyone raved. Not to toot my own horn, but this is better than taco crack: it's taco black tar, baby. The best part is that it takes minutes to throw it into a disposable container.

Layered Taco Dip

1. Use a hand mixer or standing electric mixer to whip one and a half packages of room temp cream cheese (12 oz) with 16 oz of Greek yogurt (two small containers) until thoroughly combined. You may need a splash of milk or cream to help blend everything together smoothly. Spread the cream cheese mixture along the bottom of a disposable container. The size doesn't really matter, but we used a disposable lasagna pan.

2. Evenly distribute one pound of cooked ground beef or turkey over the cream cheese. Prepare the meat beforehand like you would for tacos. Why not make your own taco seasoning?


3. Pour salsa or taco sauce over the meat. We used about half a bottle. Add more if you want it to be spicier.

4. Place diced tomatoes or quartered cherry tomatoes onto the taco sauce.


5. Sprinkle whatever kind of cheese you want on top of the tomato layer. We used half a bag of shredded four-cheese Mexican blend.


6. Top your taco dip off with shredded or chopped lettuce. Be sure the pieces are bite-sized; if they are too big, it will be impossible to get any lettuce on a chip!


Serve to an adoring crowd with your favorite chips (Tostitos Scoops are the perfect match for this hearty dip!)

Enjoy! xo

Saturday, December 15, 2012

When piggy meets pasta: a love story

Hello, lovelies!

 I apologize for the briefness of my last post. Unfortunately, the closer it gets to Christmas, the crazier things get both at home and at work. I spend the nights and weekends crafting gifts and thus get less sleep than usual. I am NOT a happy camper on less than 8 hours of sleep; really, I'm a short-tempered beast. That kind of mindset doesn't go over well at work where I need to be super energetic and cheerful for the holiday season. You may notice this is a vicious cycle. I hate feeling so wiped out, especially because I love Christmas and I cannot wait to visit family and friends in the coming weeks. I keep reminding myself to be grateful for having a full-time job, the ability to celebrate a holiday without fear of persecution, and having loved ones in my life.


But sometimes, you just have a shitty day in spite of all the goodness in your life. I had a couple rough days working with some very needy teens this week, and my heart broke more than once.

I wanted to make comfort food to help Mr. J and I unwind. Since Mr. J is a major fan of the piggy and I love pasta, the idea of putting the two together made us grin like idiots. Here is what I came up with. And, yes, it totally helped us chill out and put us in a better head space.

Lemon Garlic Spaghetti with Sausage

In a medium skillet, brown 1 pound of sausage

In anther medium or small skillet, saute on medium heat:
  • 5 Tbs. olive oil
  • 1 Tbs. butter
  • 4 chopped garlic cloves
  • 3 Tbs. chopped mushrooms (or more if you like more)
  • 3 Tbs. lemon juice
  • 1/4 tsp. salt
  • 1/4 tsp. pepper
  • 1/4 tsp. dried thyme
When the sausage is browned, add it to the lemon garlic sauce. Turn heat to low.


In a large pot, boil 1 pound of whole wheat spaghetti.

When the spaghetti is cooked and strained, return it to the pot. Add the sausage sauce.

Toss thoroughly. Top with more lemon juice and Parmesan cheese.

Enjoy! xo

Thursday, December 13, 2012

Feta Potato Patties: Sexy Vegetarian Thursday!

Hey, everyone. I am beyond exhausted tonight so I am keeping this short and sweet. This is what I whipped up for dinner at 8pm tonight for Sexy Vegetarian Thursday! Hope you're all getting rest during this crazy holiday month.

Feta Potato Patties

1 1/4 lbs. potatoes
1 egg
1 Tbs. lemon juice
1 tsp. dried dill, chopped finely
4 oz. feta cheese
1/4 tsp. garlic powder
1/4 tsp. onion powder
dash of salt and pepper


Peel, cube, and boil the potatoes until they're soft and mash-able. Then mash 'em, mkay?


I don't know why this photo is lopsided.... Anyhow, this is where you mix everything together! Put the mixture in the fridge for at least 45 minutes so it can cool and firm up.


Make patties, whatever size you want, our of the mix.


Then, dredge the patties in a bit of flour, just enough to cover them.


Heat 3 Tbs. olive oil in a pan. Fry the patties for a few minutes on each side until they're golden brown!


Serve immediately and enjoy xo

Monday, December 10, 2012

Jewelry Swap Party and some tasty hummus!

Hiya, everyone!

It's been a couple days since I had time to update. This weekend has been so busy! On Saturday, I had some girlfriends over for a jewelry swap party. I came up with this idea as a fun way to get together before the holidays. Here's how it worked: everyone brought at least three pieces of jewelry (one pair of earrings counted as one piece). We each laid out our jewelry and went around described each pieces' story (because we all know there's a little fable that goes with each piece!). We then each had 2 chances to "claim" our top choice of someone else's jewelry. After that, we had a "free for all" when we grabbed the pieces we liked and asked if anyone else wanted to challenge the grab. Luckily, our gathering was very casual and no one raised any objections to one another's choices. We did have a very simple backup plan: we would draw a name from a cup to break a tie. The event was wonderful! It was really fun to catch up with the girls, PLUS we all got free jewelry!

I made a tasty treat for the ladies that I want to share with you all.


*edited to add this: my organic hummus priced out at $1.20 per 8 oz. (thanks to Mr. J for doing the math on that one. I nearly had a stroke when I realized I was going to have to convert volume to weight. Thankfully, he is much more blessed in the math department than I am.)

That's right. This recipe costs me about less than $3 for2.5 cups! Check that versus a Wegmans 8 oz. of organic hummus for $2.99. Mine costs HALF AS MUCH.*


Perfect Organic Hummus

Flavorful, smooth, simple, organic hummus. This makes a great base for flavored hummus.

Makes 2.5 cups

Total Time: 5 minutes

Ingredients
 19 oz. organic garbanzo beans (1 ¼ cans)
half of the liquid from one can (this is the key to smooth hummus!)
2 to 3 cloves garlic
5 Tbs. lemon juice
2 ½ Tbs. organic tahini sauce
½ tsp. cumin
1 tsp. salt
olive oil and paprika to top

Directions
1. In a blender, combine all ingredients except olive oil and paprika until smooth.
2. Drizzle olive oil over hummus, and sprinkle paprika on top.


Later that night, Mr. J and I traveled to see a Syracuse Orange game. It was really fun! Aren't we cuuuute?!

                                                                This is my booooooo :)